

Master the Art of Perfect Grip
Kick wax, klister, hard wax, snow temperature—the world of waxable Nordic skis can feel perplexing and complicated. We’re here to dispel the mystery and dive into one of Nordic skiing's most rewarding skills.
If you've been curious about waxable Nordic skis and the whole waxing process, or you're looking to take your skiing to the next level, you've come to the right place. Waxable skis that are prepared correctly ski faster, further, and with less effort than their waxless counterparts.
You'll need to learn about different waxes, pay attention to snow conditions and temperature, and invest some time in preparation. However, when you match your grip wax perfectly to the day's conditions, waxable skis produce an unmatched balance of grip and glide.
Unlike waxless skis with their built-in textured patterns, waxable skis have a smooth base throughout. You create traction by applying grip wax (also called kick wax) to the middle section of the ski—the "kick zone" or "wax pocket"—while keeping the tips and tails smooth for gliding.
This lets you fine-tune your grip and glide for the exact conditions you're skiing in, meaning when you nail it, you get better performance than any other system can offer.
You'll need to carry a small wax kit, check the temperature before heading out, and spend a few minutes prepping your skis. But for the wax-savvy in our community, this ritual is part of the joy, connecting you more deeply to the snow and the sport.
We've got the knowledge and the gear to get you started—click here to shop our Waxable Nordic Skiing collection from Neptune Mountaineering.
Understanding Grip Wax: The Basics
Alright, let's demystify grip wax! It's not as complicated as it might seem at first. Grip wax (or kick wax) is applied only to your kick zone and provides traction when you push off.
There are two main types you'll encounter:
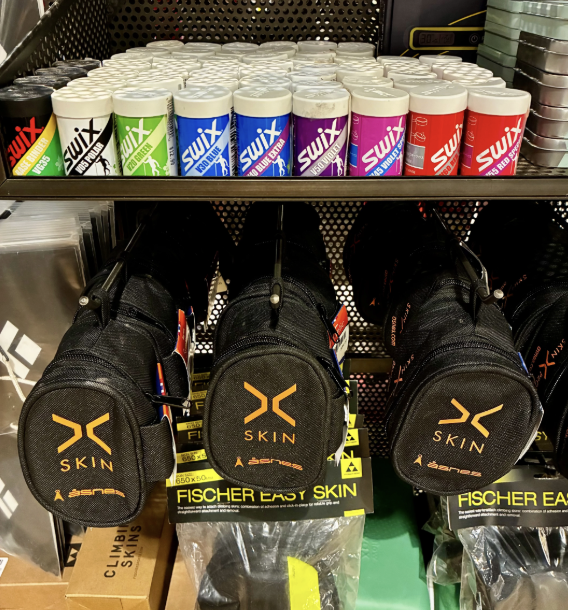
Hard Wax is used in colder conditions (generally below freezing). The Swix hard wax carried at Neptune Mountaineering comes in different colors, each designed for a specific temperature range:
White: Polar conditions (-25°C to -12°C / -13°F to 10°F)
Green: Very cold conditions (-15°C to -8°C / 5°F to 18°F)
Blue: Cold conditions (-10°C to -2°C / 14°F to 28°F)
Violet: Around freezing (-3°C to 0°C / 27°F to 32°F)
Red: Warm, wet conditions (0°C to +1°C / 32°F to 34°F)
Klister is a stickier wax used in warmer conditions (usually above freezing) or when snow is wet or icy.
The key principle: match your wax to the snow temperature (not the air temperature). Snow temp is usually close to the forecasted low for the day.
Applying Hard Wax: Your First Steps
Ready to wax your skis? Let's start with hard wax.
What you'll need:
Appropriate grip wax for the day's conditions
Cork (for smoothing the wax)
Scraper (for removing old wax)
Here's how to do it:
Start with clean skis - Remove any old wax from the kick zone using your scraper. The base should be clean and dry.
Apply the wax - Rub the wax stick directly onto your kick zone in smooth, even strokes. You want a thin, uniform layer—you really don't need a lot!
Cork it smooth - Use your cork to rub the wax in. Run the cork up and down the ski over the wax with firm pressure. This smooths it out and helps it bond to the base. The wax should look even and somewhat shiny when you're done.
Test and adjust - Head out and ski! If you're slipping on the kick, you might need another thin layer or a softer (warmer) wax. If you're getting too much drag or snow is sticking, you might have too much wax or need a harder (colder) wax. (Pro tip: often just a dab of red wax under the ball of your foot helps!)
Don't worry if you don't get it perfect the first time. Part of the fun is learning to "read" the snow and fine-tune your wax choice. Every outing teaches you something!
Skiing in Warmer Conditions and Wetter Snow
Spring skiing and warmer conditions will require a different approach. You have two options: klister and skins.
When to use klister:
Temperatures above freezing
Wet, granular snow
Icy conditions
How to apply klister (the neat way):
Warm it up - Klister is easier to work with when it's warm. You can warm the tube in your pocket or under warm water.
Apply in strips - Squeeze thin ribbons of klister along your kick zone. Don't glob it on!
Smooth it out - Use a plastic scraper to spread the klister into a thin, even layer. Some folks warm it gently with a heat gun or torch, but be careful not to damage your bases.
Let it cool - Allow the klister to cool completely before skiing. It should be tacky but not gooey.
Pro tip: Klister is sticky stuff! Keep some wax remover or paper towels handy, and consider wearing old clothes or an apron and a dedicated "klister bag" for messy waxing supplies.
Mohair vs Nylon Skins: A Modern Alternative
Nordic skins! These strips of grippy material stick to the underside of your kick zone as an alternative to traditional grip wax or klister. They're especially popular for backcountry touring, but many recreational skiers love them too.
What are Nordic skins? Think of them as a middle ground between waxless fish-scale patterns and traditional grip wax. They're removable fabric strips with directional fibers that grip when you push back but glide smoothly when you slide forward. You attach them to your kick zone, ski, then remove them when you're done—no scraping or wax removal needed!
The two main types:
Mohair Skins are made from natural goat hair (mohair). They produce superior glide and are lighter weight, making them better for groomed trails and faster skiing. They are generally more expensive, require more care, and can ice up in wet conditions. However, proper maintenance—drying after each use, storing them glue-side to glue-side, using a skin spray to prevent buildup—will keep you gliding smoothly for many seasons.
Nylon Skins are made from synthetic materials. They produce better grip, especially in challenging conditions, and are more durable and abrasion-resistant. They tend to be less expensive and less prone to icing; however, you may experience more drag and a slower glide than with mohair. Their low-maintenance and high performance in variable conditions make them an easy choice for beginners.
When to use skins instead of wax:
You don't want to deal with waxing
Highly variable conditions (where wax choice would be tricky)
Backcountry tours with lots of climbing
Warm, wet conditions that would require klister
Care and maintenance: After skiing, remove your skins and let them dry completely before storing them. Keep them clean—dirt and debris can affect performance. Many skins are reusable for multiple seasons with proper care.
Skins have made Nordic skiing more accessible and enjoyable for many people in our community. They're especially great if you're still learning to wax or if you ski infrequently and don't want to maintain a full wax kit.
Glide Wax: Don't Forget the Tips and Tails!
The smooth sections at your ski tips and tails need glide wax to perform well. All skis—whether waxable or waxless—should have glide wax applied.
You can use a liquid or rub-on glide wax, applied to the tips and tails (avoiding your kick zone). For better performance, bring your skis into the Neptune ski shop for a professional wax job.
A little glide wax maintenance goes a long way toward making your whole skiing experience smoother and more enjoyable!
Reading Snow Conditions and Choosing Your Wax
This is where waxable skis become an art form! Learning to read snow conditions helps you choose the right wax and get that perfect performance.
Cold, Dry Snow (New Snow) - Fresh snow crystals are sharp and pointy. Use a harder wax matched to the temperature (green or blue range).
Warming Conditions - As the day warms up or snow gets worked over, you can add a layer of softer wax on top of your base layer. This is called "layering," and it's a key technique for changing conditions.
Wet, Transformed Snow - This is klister or skin territory! When snow gets wet, granular, or icy, hard waxes won't grip well. Switch to a klister matched to the temperature and snow type, or throw on your skins.
Icy or Crusty Snow - These can be the trickiest conditions. Often, you'll need a hard klister or special ice wax. Don't be discouraged if grip is challenging—sometimes you just have to ski more carefully and focus on technique.
Fresh Powder - Beautiful! New snow usually works great with hard wax. Match it to the temperature and enjoy the magic.
Start conservative (harder/colder wax) and add softer wax if needed. It's easier to add than to remove and start over.
Keep notes on what works—over time, you'll develop an intuition for your local conditions!
Managing Your Wax Kit
Part of embracing waxable skis is building and managing your wax kit. Here's what we recommend having:
Essential items:
3-4 hard waxes (blue, violet, red to start)
1-2 universal klisters
Cork
Scraper
Wax remover and rags
Nice to have:
More specific temperature waxes
Base klister (for better grip wax adhesion)
Waxing iron and glide wax
Brush for glide zones
Thermometer
Store your waxes in a cool place, and keep your klister tubes from getting too hot (they can explode in a hot car…don’t ask how we know). Many folks keep a small kit for quick touch-ups and a larger kit at home for full wax jobs.
When Conditions Change Mid-Ski
You start skiing and realize your wax isn't quite right. What do you do?
If you're slipping (not enough grip):
Add another thin layer of the same wax
Add a layer of softer (warmer) wax on top
Scrape off and start with softer wax or klister, or just switch to skins
If you're getting too much drag or snow is icing up:
Scrape off some wax
Or use a harder (colder) wax
Sometimes, just skiing will wear off excess wax
Carry a small cork and scraper in your pack for trail-side adjustments. Part of the learning curve is developing this troubleshooting skill!
Caring for Your Skis
A little love goes a long way! After each outing, wipe down your skis to remove snow and moisture. You can leave grip wax on for multiple outings if conditions stay similar, but remove it periodically to keep your bases healthy.
For glide zones, clean and rewax them every few outings or when they start looking dry. At the end of the season, remove all grip wax, clean the kick zone thoroughly, and apply a thick coat of storage wax to all smooth areas of the base.
Store your skis in a cool, dry spot away from sunlight and heat—flat or hanging with tips up works great. Periodically, check your bindings and inspect your bases for damage.
Think of ski maintenance as an investment—the better you care for your skis, the better they'll perform and the longer they'll last!
Get Out There and Master It!
So there you have it—everything you need to know to get started with waxable Nordic skis! Yes, they require more work than waxless skis, but when you nail it, waxable skis can outperform waxless models with a level of performance that's truly rewarding.
By learning to read snow conditions, practicing your waxing technique, and adapting as needed, you're setting yourself up for an incredible Nordic skiing experience.
Don't be intimidated by the learning curve—everyone who waxes skis started exactly where you are now. Start simple, take notes on what works, and don't be afraid to ask for help. Here at Neptune Mountaineering, we're always happy to talk wax and help you dial in your setup.
Winter is waiting, the trails are calling, and trust us—there's nothing quite like the feeling of perfectly waxed skis. We'll see you out there!
